By Barron K. Henley, Esq.
First, Microsoft Word does not actually have a feature called Paragraph Glue. That’s just an umbrella term I use to describe two (sticky) features. The first (Keep With Next) will hold one or more paragraphs together on a page; and the second (Keep Lines Together) will hold the lines of a particular paragraph together on a page.
To the extent you’re wondering why you haven’t seen the buttons for these features, well that’s because there aren’t any buttons for them. Important functions a legal user would likely need for just about any document are present, but often concealed. However, that doesn’t mean they are inaccessible. The following is a description of these features, when they’re appropriate to use, and how to utilize them.
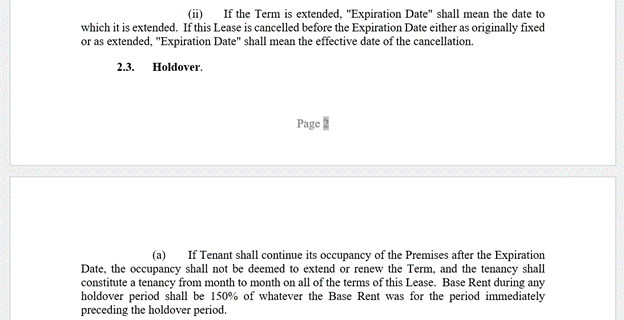
Keep With Next: Let’s begin with an explanation of the problem this feature resolves. In the screenshot below, you see a very common issue in legal documents which I’d refer to as an awkward page break. I would obviously want paragraph 2.3 to move to the top of page 3 and not be marooned at the bottom of the page 2.
Unfortunately, most users try to resolve this issue by adding hard returns (Enter key) or page breaks above the title. To be clear, that technique is only a temporary fix and you should never use that technique again if that’s your typical approach. The problem with those faux fixes is that if the document undergoes further editing and more text is added or deleted above it, you’re likely going to have to remove those hard returns or page breaks later or you’ll end up with gaps/blank pages in your document. You may be thinking, “well I only do that when the document is finalized – so I don’t have to worry about further editing.” Respectfully, that’s still not a valid defense because almost all new documents in law offices are created from existing documents (as templates). Thus, it’s likely that the document you finalized today may be used as a template at some future date, in which case it will undergo further editing.
When that happens, the latent defect you created in the original document is likely to show itself.
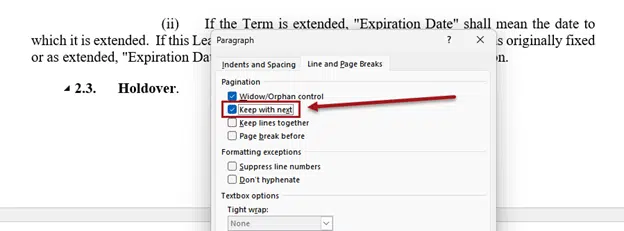
A superior way to deal with this is to simply glue paragraph 2.3 in the foregoing example to any subsequent paragraph so you don’t have to worry about it again and you don’t have to add any hard returns or page breaks. To utilize this feature, you should not select paragraphs 2.3 and (a) although that would seem a logical first step. Instead, you want to focus solely on the paragraph/title/heading you want to glue to a subsequent paragraph. Simply right-click the paragraph/title (Holdover in this case) ➡️ choose Paragraph from the menu that appears ➡️ click the Line and Page Breaks tab at the top of the subsequent dialog ➡️ check Keep with next ➡️ click OK.
You don’t want to select paragraphs 2.3 and sub (a) before right-clicking is because that will glue paragraph 2.3 to (a), and subparagraph (a) to subparagraph (b). If you glue too much text together, I guarantee you’ll start seeing bizarre page breaks in your document. So a little glue is good, but you don’t want it on everything or you’ll have a whole new formatting issue to resolve (random gaps and inexplicable page breaks). As such, you need to be surgical in your application of this feature, and be careful not to apply it where you don’t actually need it.
Keep Lines Together: This is a slightly different type of glue compared to Keep With Next. In this case, you’re not gluing one paragraph to another, you just want to hold the lines of a particular paragraph together. For example, you would not want a page break to occur in the middle of the highlighted paragraph below.
If you work with footnotes, you may have also seen Word decide to split a footnote across multiple pages (and I’ve still never met anyone who wanted one footnote split across multiple pages). This feature solves that problem as well. If you want to hold the lines of a paragraph (or footnote) together on a page, simply right-click the paragraph ➡️ Paragraph ➡️ Line and Page Breaks tab ➡️ check Keep lines together ➡️ OK.
Using Both Features Together: It is often appropriate to use both types of glue together on a block of text. For example, in the foregoing acknowledgment, I want the state and county to stick to the “Be it remembered…” paragraph, I want the lines of the paragraph in the middle stuck together on a page, and I want the paragraph to also adhere to the signature blank for the Notary. As such, I would select/block the entire acknowledgment ➡️ right-click ➡️ paragraph ➡️ check both Keep with next and Keep lines together ➡️ OK. After doing that, the entire acknowledgment will move as a unit and always stay together on a page.
Make These Features Easier to Access: Interestingly, you can add buttons for these features to the Quick Access Toolbar or even the main ribbon. How to do that is beyond the scope of this article, but if you already know how to add custom buttons to Word, be advised that although the features are called Keep with next and Keep lines together, the buttons for them are called Para keep with next and Para keep lines together, respectively. If you think it’s ridiculous that Microsoft would alphabetize features that begin with “k” under the letter “p,” well, join the club.
Want To Learn More? The biggest problem in legal tech is the under-utilization of existing tools. If you’d like to take better advantage of Word, Outlook, Excel, PowerPoint, Acrobat, training is a great way to increase your office’s efficiency and reduce user frustration. To learn more about the legal-specific training options Affinity Consulting offers, just contact Barron Henley (bhenley@affinityconsulting.com or 614.602.5561).
Barron K. Henley, Esq.
Affinity Consulting Group
bhenley@affinityconsulting.com


